A well-functioning kitchen is the heart of any home, and a ductless range hood plays a crucial role in maintaining a pleasant cooking environment. Unlike ducted systems that vent air outside, ductless hoods rely on activated charcoal filters to purify and recirculate air, effectively trapping grease, smoke, and, most importantly, odors. However, these hardworking filters have a limited lifespan. Ignoring their replacement can lead to lingering cooking smells, reduced ventilation efficiency, and a less enjoyable kitchen experience. This comprehensive guide will walk you through the simple process of replacing the charcoal filters in your ductless range hood, ensuring your kitchen remains fresh and functional.

Why Charcoal Filters Are Essential for Ductless Hoods
Table is empty.Ductless range hoods are a popular choice for homes where external venting is not feasible. Instead of expelling air outdoors, these systems draw in cooking fumes, pass them through a multi-stage filtration process, and then release the cleaned air back into your kitchen. At the core of this process are the charcoal, or carbon, filters. These specialized filters are packed with activated carbon, a porous material renowned for its ability to absorb microscopic odor molecules, smoke particles, and some volatile organic compounds.
Unlike the metallic grease filters, which can often be cleaned, charcoal filters are designed for absorption and cannot be effectively washed or regenerated once saturated. Over time, the activated carbon becomes clogged with odors and particulates, losing its filtration capacity. A saturated charcoal filter not only fails to eliminate smells but also restricts airflow, forcing your range hood’s motor to work harder and potentially shortening its lifespan. Replacing these filters regularly is paramount for maintaining optimal indoor air quality and extending the life of your appliance.
Signs It’s Time for a Filter Change
Recognizing when your charcoal filters need replacing is key to a continuously fresh kitchen. Pay attention to these common indicators:
- Lingering Odors: The most obvious sign is that cooking smells, especially from strong spices, fried foods, or fish, persist in your kitchen long after you’ve finished cooking.
- Reduced Suction Power: If you notice your range hood isn’t pulling smoke and steam as effectively as it used to, clogged filters could be to blame.
- Visible Smoke or Vapor: Excess smoke or steam accumulating in the kitchen even while the hood is running indicates poor filtration and airflow.
- Grease Buildup: An unusual layer of grease or oil appearing on surfaces around the range hood might suggest that filters are no longer capturing airborne grease efficiently.
- Increased Noise from the Hood: A struggling motor due to restricted airflow may produce a louder humming sound or work harder than normal.
How Often Should You Replace Charcoal Filters?
The frequency of charcoal filter replacement largely depends on your cooking habits and the manufacturer’s recommendations. As a general guideline, most manufacturers suggest replacing charcoal filters every three to four months, or after approximately 120 hours of use.
However, if your household frequently engages in intense cooking, such as deep-frying, grilling indoors, or preparing dishes with strong, aromatic spices, you may need to replace them more often—perhaps every one to two months. Conversely, if you cook infrequently, you might be able to extend the interval slightly, but never go beyond six months without replacement, as the carbon’s efficacy diminishes over time regardless of usage. Always consult your specific range hood’s user manual for the most accurate and personalized replacement schedule.
Preparing for Replacement: What You Need
Before you begin the replacement process, gather a few items to ensure a smooth and safe experience:
- New Charcoal Filters: Refer to your range hood’s user manual or the manufacturer’s website to identify the correct model number, size, and type of charcoal filter compatible with your unit. Using an incompatible filter can compromise performance and fit.
- Screwdriver (Optional): Some range hoods use screws to secure the grease or charcoal filters.
- Cleaning Supplies: A mild degreaser and a cloth can be helpful for wiping down any accessible greasy surfaces while the filters are out.
- Gloves (Optional): To protect your hands from grease and dirt.
Step-by-Step Guide: Replacing Your Ductless Range Hood’s Charcoal Filters
Replacing your ductless range hood’s charcoal filters is a straightforward DIY task that typically takes only a few minutes. Follow these steps carefully:
1. Safety First: Disconnect Power
Before touching any internal components of your range hood, always prioritize safety. Turn off the power to the unit. This typically involves flipping the breaker switch at your fuse panel or unplugging the appliance if it’s connected via an outlet. Never reach into a range hood while it is powered on.
2. Access the Filters
Locate the filters within your range hood. In most ductless models, the charcoal filters are positioned behind the metallic grease filters, either on the underside of the hood or within the unit near the blower fan.
3. Remove Existing Grease Filters (If Present)
Many charcoal filters are situated behind the primary aluminum mesh or stainless steel baffle grease filters. To access the charcoal filters, you will first need to remove these. Grease filters are usually held in place by small clips, tabs, or sometimes screws. Gently push in or slide the clasps, or unscrew any retaining screws, and carefully pull out the grease filters. Set them aside on a protected surface.
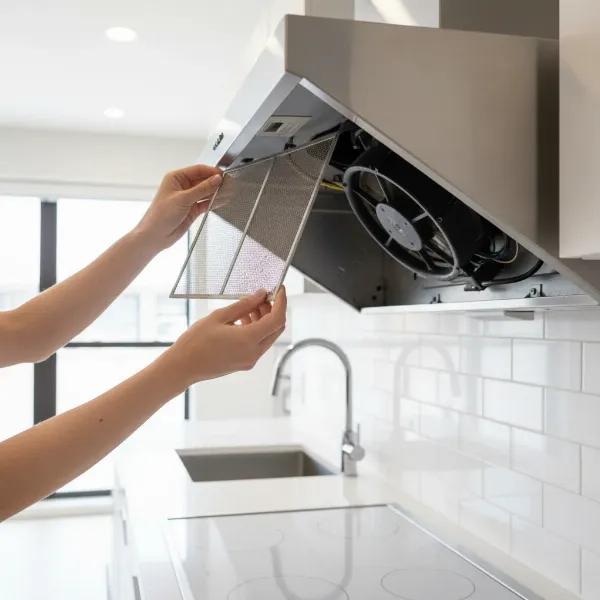 A person removing a metal grease filter from a ductless range hood to access the charcoal filters, showing the clips and interior of the hood, clean kitchen style
4. Detach the Old Charcoal Filters
Once the grease filters are out, you’ll see the charcoal filters. These can come in various configurations:
- Rectangular or Square Filters: Often, these slide into a frame or are secured by small plastic tabs. To remove, push on the edge tabs or slide the filter inward to release it, then pull it out.
- Round Filters: Some models feature round carbon filters that twist directly onto the blower fan. To remove, simply twist them counter-clockwise until they detach.
Carefully remove the old, saturated charcoal filters and dispose of them. It’s advisable to wear gloves as they may be greasy.
5. Install the New Charcoal Filters
Unpack your new charcoal filters. Ensure they are the correct type and size for your range hood.
- Rectangular or Square Filters: Align the new filter with its designated slot and slide it into place. Ensure it clicks or slides effortlessly and securely, without any gaps. If your hood uses clips or screws, fasten them tightly.
- Round Filters: Align the new round filter with the blower fan and twist it clockwise until it locks firmly into place.
If your range hood uses multiple charcoal filters, replace all of them simultaneously, even if some appear less dirty than others, to ensure balanced and effective filtration.
6. Reinstall Grease Filters
Once the new charcoal filters are securely in place, carefully reinsert the metallic grease filters you removed earlier. Ensure they align correctly with their slots or holders and that any clips or screws are fastened tightly. Double-check that all filters are snugly in position and that there are no gaps.
7. Restore Power and Test
With all filters securely reinstalled, restore power to your range hood by flipping the breaker back on or plugging it in. Turn on the range hood to test its function. You should immediately notice improved airflow and a quieter operation if the old filters were heavily clogged.
Understanding Different Charcoal Filter Types and Installation Variations
While the general steps are similar, the exact mechanism for removing and installing charcoal filters can vary slightly depending on your range hood’s brand and model.
- Round Carbon Filters: These are commonly found mounted directly onto the blower fan. Their twist-to-lock mechanism makes replacement quite intuitive.
- Rectangular or Square Filters: Often designed to sit behind the primary grease filters, these typically slide into a designated frame or are held by small tabs.
- Cotton Charcoal Filters: Some manufacturers, like Hauslane, offer cotton-based charcoal filters, often found in under-cabinet models. The installation principles remain similar: access, remove, and replace.
- Hybrid Baffle Filters: Some advanced systems combine baffle filters with carbon layers. If your hybrid baffle has a charcoal component, it must be replaced, while the metal baffle part might be cleaned.
The most crucial advice is to always consult your range hood’s owner’s manual for model-specific instructions. This will provide precise details on accessing and securing your particular filter type, preventing damage to the unit or improper installation.
Tips for Extending Filter Life and Maintaining Your Range Hood
While charcoal filters must be replaced, you can take steps to optimize your range hood’s overall performance and ensure a cleaner kitchen:
- Regular Grease Filter Cleaning: If your ductless hood uses metallic grease filters, clean them frequently (monthly or bi-monthly) to prevent grease buildup. Clean grease filters ensure better airflow and protect the charcoal filters from premature clogging.
- Wipe Down Exterior Surfaces: Regularly wipe down the exterior of your range hood to remove grease and dust, which can accumulate over time.
- Use the Right Fan Speed: Employing the appropriate fan speed for your cooking task can reduce strain on the motor and filter system.
- Pre-Cleaning Blower Cover: When replacing charcoal filters, take a moment to gently wipe any visible grease from the blower cover, if accessible.
Conclusion
Replacing the charcoal filters in your ductless range hood is a simple yet vital maintenance task that significantly impacts your kitchen’s air quality and your appliance’s longevity. By following these straightforward steps and adhering to a regular replacement schedule, you can ensure your kitchen remains free from unpleasant odors, fresh, and comfortable. Don’t let saturated filters diminish your cooking experience—a small effort in maintenance yields significant rewards in a cleaner, healthier home.
What benefits have you noticed in your kitchen since regularly replacing your range hood’s charcoal filters?
Frequently Asked Questions
Why can’t I clean charcoal filters instead of replacing them?
Charcoal filters contain activated carbon, which works by chemically absorbing odor molecules. Once these pores are saturated with impurities, the filter loses its effectiveness. Cleaning them with water or soap will not reactivate the carbon or clear its absorbed compounds, making replacement the only way to restore odor filtration.
How do I know what type of charcoal filter my ductless range hood uses?
The best way to determine the correct charcoal filter type and size for your ductless range hood is to check your appliance’s user manual. It will provide the specific model number or part number for compatible replacement filters. Alternatively, look for a label inside the hood or on the existing filter itself.
Can I use a universal charcoal filter for my range hood?
While some “universal” filters exist, it is highly recommended to use filters specifically designed or approved by your Range Hood’s manufacturer. Correct fit is crucial for optimal performance, ensuring no air bypasses the filter, and for maintaining the integrity and warranty of your appliance.